ActiveX Barcode Control & DLL User Manual
- Installing the ActiveX Barcode Control
- Setting Properties
- Symbology-Specific Notes
- Developer Notes
- Integrating into InfoPath
- Using Barcode Generator
- Technical Support FAQ
Buy License Support Download Demo Release Log
If a barcode scanner is not available for testing, consider these hand-held barcode scanner kits.
Installation & Overview
The IDAutomation ActiveX Barcode Control supports several Linear and 2D barcode symbologies without using fonts. They are easy-to-use, "drag and drop" graphic objects and are compatible with Windows applications that support ActiveX including Word, Excel, InfoPath, Visual Basic, C++, FrontPage, and web browsers that support ActiveX. This ActiveX Barcode Control also functions as a DLL that generates, prints and saves WMF images.
Three steps must be followed to use the IDAutomation ActiveX Barcode Control:
- Install and Register the Barcode Control in
Windows
Install the ActiveX Barcode Control by running the executable file included in the package; this will register the control in Windows and install several implementation examples. The barcode control must be installed and registered in Windows before an application will be able to identify it. If desired, the DLL may also be registered manually from the command line by executing REGSVR32 DLLNAME at the prompt where DLLNAME is the name of the ActiveX DLL in the current directory. - Install the Barcode Control in the
Desired Application
After the control has been installed and registered on the PC, it may be activated in any application that supports ActiveX or COM. Several installation tutorials are included in this document. For applications that are not listed in this document, search the application's help file for information about how to utilize ActiveX controls. - Adjust the Barcode Control Properties
The ActiveX Barcode Control properties determine the data that will be encoded in the barcode as well as other options such as barcode type and size.
Installation in Word
- Word 2000/2003 Choose View - Toolbars - Control Toolbox. There should
now be a toolbox visible. On the toolbox, choose the "more controls button."

Word 2007 and Greater Select the Developer tab. In the Controls box, select Legacy Tools and choose the "more controls button."

- Select the barcode control from the list of available ActiveX Controls and it will appear in the document.
- Size the control as necessary.
- To adjust the barcode control properties, right-click on the control and choose properties. When
finished, click on the "design mode button."

- To adjust the barcode control properties, the user must be in design mode. If problems are encountered editing the properties of the control, press the design mode button to enable it.
- The data encoded in the barcode may be static or modified with the use of VBA code.
Word Mail Merge
ActiveX Controls may be used in a Word mail merge if the merge is performed with a VBA macro. The following describes this process:
- Install the barcode object on the merge document and determine the name of
the object by right-clicking on it. In this case, it is "BarCode1". If
unable to access the properties of the object, choose the Developer and select Design
Mode. To enter Design Mode in Word 2000 and 2003, choose View - Toolbars -
Control Toolbox and choose the design icon.
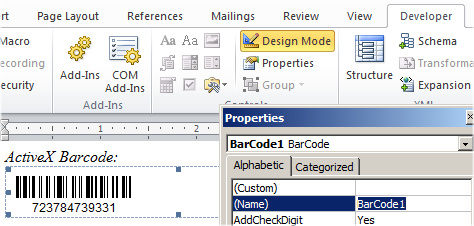
- Determine the name of the merge field used to encode in the barcode. In this example, it is "Merge1".
- Open the Visual Basic editor by choosing Developer - Visual Basic. Office 2000 and 2003 users choose Tools - Macro - Visual Basic Editor.
- Download the ActiveX mail merge example and extract the IDAutomation_ActiveX_MailMerge.bas file. Within the Visual Basic Editor, choose File - Import and select IDAutomation_ActiveX_MailMerge.bas.
- After the file is imported, it should show up in the modules section. Click
on this module to reveal the code.

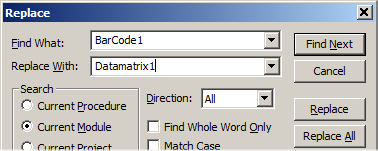
- Choose Edit - Replace. Change the name of the object from Barcode1 to the
object name determined in step 1 and choose Replace All. Change the name of
the merge field from Merge1 to the actual merge field determined in Step2 and
choose Replace All.
- Choose File - Save and File - Close to Return to Word.
- To perform the mail merge, choose ALT-F8 or Developer - Macros and run the appropriate macro. A print preview macro is included that will print one page from a selected row number. If an error message is received such as "macros in this project are disabled" that will not allow the macro to run, change the security level of the macros as outlined in this Microsoft KB.
- NOTE: The normal method of performing a mail merge will create multiple pages with a barcode that is not linked to a mail merge field. The only method of linking the barcode to a mail merge field is by executing the macro.
Installation in Access
NOTE: IDAutomation no longer recommends using ActiveX Controls in Access. IDAutomation suggests the Native Barcode Generator for Access or the Barcode Fonts with VBA Macros.
ActiveX Barcode Controls work only in older versions of Access. When used in reports and forms, these controls may be dragged into the design area and connected to database fields.
-
Open
the report in design mode.
- Access 2000/2003 Choose insert - ActiveX control.

- Access 2000/2003 Choose insert - ActiveX control.
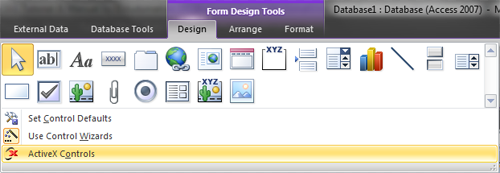
- Access 2007/2010
While in Design View, Select the Form Design Tools tab* - Select the side drop-down
- Select ActiveX Controls.
- For Access 2013 and greater, IDAutomation suggests the Native Barcode Generator for Access or the Barcode Fonts with VBA Macros due to an incompatibility with the C++ ATL encoding of the control with newer versions of Access.
- Move and size the control necessary. To change the properties of the control, such as barcode height and symbology type, right-click on the control and choose properties.
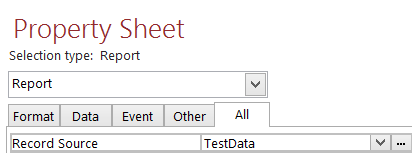
- In the Property Sheet drop-down menu, select Report and change the
Record Source to the table where the barcode field of the ActiveX control
resides:
- To bind the barcode to a data source, select the table in the control source field in the same manner as for a text control.
- Verify the correct data is encoded in the barcode. If it does not, consult
Access Help to determine how to get the correct data in the Control Source
field. The result of the Control Source is what will be encoded in the barcode.
When working with multiple tables, it may be necessary to specify both the table
and field in the control source;
for example:
=([Table1.Field1])
- Optional: A single formula or VB Script may be used in the control
source property, which allows the combining of multiple fields and/or
prefix and suffix values. For example:
="PREFIX" & [Field1]
=[Field1] & [Field2]
=[Field1] & "," & [Field2]
=("PrefixText"&[Table1.Field1] & "~009" & [Table1.Field2] & "SuffixText")
When distributing an Access Database, the ActiveX Barcode Control must be installed on each computer used to print barcodes. For a complete barcode generator object that stays embedded in the database, consider the Native Barcode Generator for Access.
Installation in Excel
ActiveX Barcode Controls may be used in Microsoft Excel and may be modified by referencing a cell, or via the use of VBA code.
- Excel 2000/2003 Choose View - Toolbars - Control Toolbox. There
should now be a toolbox visible. On the toolbox, choose the "more controls
button."

Excel 2007/2010/2013 Select the Developer tab. - In the Controls box, select Insert and choose the "more controls button." Step-by-Step Instructions
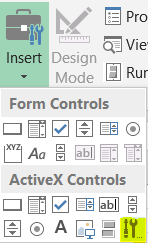
- Select the barcode control from the list of available ActiveX Controls. Click and drag the control for the desired placement in the spreadsheet and size it as necessary.
- To modify the properties of the
control, the user must be in design mode, then right-click on the
control and choose properties. When finished, click on the "design mode
button" to exit.

- To link a cell to the data to be encoded in the barcode,
enter the cell in the "LinkedCell" property of the control. Refer to the Linking cells in ActiveX page for more detailed instructions.
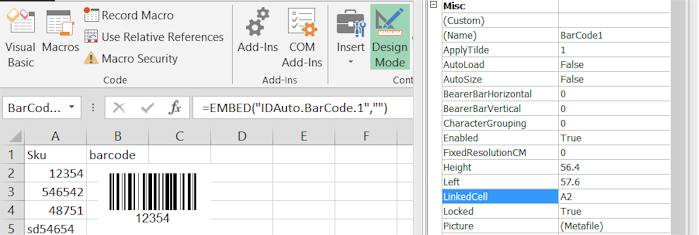
ActiveX Controls cannot be used to populate a column in Excel and must be placed individually. If this is needed, consider barcode fonts which can be used to generate a column of barcodes.
Installation in FrontPage and HTML
NOTE: The use of ActiveX is deprecated by Microsoft and will not work in modern web browsers. IDAutomation recommends using another product to generate barcodes for web browsers such as ASPX Scripts, Streaming Barcode Server for IIS, Java Servlets, JavaScript Barcode Generators, or PHP Scripts.
Using the ActiveX Barcode Control in FrontPage
- Choose Insert - Advanced - ActiveX Control (In FrontPage 2003, choose Insert - Web Component - Advanced Controls - ActiveX Control). If the control does not appear in the list, choose Customize to add it to the list of controls and select Finish.
- The control will appear on the web page. Right-click on the control to adjust properties as necessary.
- The control must be installed on every PC that accesses the web page
displaying the ActiveX control. To enable the control to automatically install,
if it is not already installed, enter the file name and path of the signed CAB
file, which is provided in the download package. IDAutomation supplies signed
CAB files in the package for this purpose. IDAutomation also provides an
online
example of installing the ActiveX Barcode with a CAB file and a
dynamic
ActiveX Control Example viewable in Internet Explorer only.
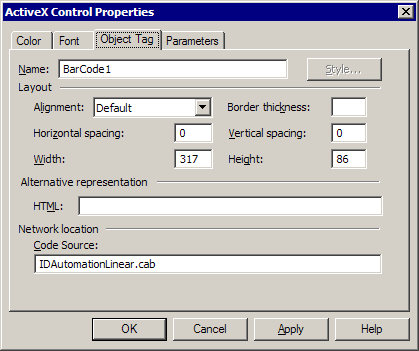
ActiveX Controls only work with web browsers that support ActiveX. If support for other browsers is required, please review the Internet Barcode FAQ.
Using the ActiveX Barcode Control in HTML
NOTE: The use of ActiveX is deprecated by Microsoft and will not work in modern web browsers. IDAutomation recommends using another product to generate barcodes for web browsers such as ASPX Scripts, Streaming Barcode Server for IIS, Java Servlets, JavaScript Barcode Generators, or PHP Scripts.
- Copy and paste the following object code into any HTML editor:
<object classid="clsid:0C3874AA-AB39-4B5E-A768-45F3CE6C6819"
id="IDAutomationBarcode" width="300" height="80" codebase="http://www.yourdomain.com/activex/IDAutomationLinear.cab">
<param name="DataToEncode" value="Linear ActiveX">
</object> - If the Linear ActiveX Barcode Control is not being used, replace the Class ID with
the values listed below:
Aztec:
EBA15B30-80B4-11DC-B31D-0050C2490048
DataMatrix:
DB67DB99-616A-4CAB-A3A1-2EF644F254E7
MaxiCode:
3F66852C-5FD8-4E70-A897-ECC1DE14019F
PDF417:
E97EE6EB-7FBE-43B1-B6D8-C4D86C78C5A0
QR-Code:
B94BB49D-0828-403F-94B5-27753E8A48A3
- Modify as necessary to size the area the barcode control will occupy.
- Change codebase= to the location of the CAB file.
- Modify other properties by specifying the param name= and value= as demonstrated in step 1 with the DataToEncode property.
Installation in Visual Basic
IDAutomation ActiveX Barcode Controls perform well in Visual Basic 6. To activate the ActiveX Barcode Control in a VB 6 project, follow these steps:
- Choose Project - Components from the menu.
- Select the barcode control from the list.
- Choose View - Toolbox. After the control appears in the toolbox, it may be placed in the VB project.
- To change the properties of the control, right-click on the control and choose properties.
- Use "code behind" to modify properties of the control, for example:
BarCode1.BarHeight=2
BarCode1.DataToEncode="12345678901"
BarCode1.SaveEnhWMF "C:\saved-barcode.wmf"
Methods of printing from the ActiveX Barcode Control in Visual Basic are as follows:
- Print Directly To The Printer: The print method
below sends the graphic barcode image directly to the printer starting at position
X=2048 and Y=1024:
Private Sub PrintDirect_Click()
   Printer.PaintPicture BarCode1.Picture, 2048, 1024
   Printer.EndDoc
End Sub - PrintForm: This printing method prints the actual form with
the barcode control and prints it at the screen DPI. Therefore,
narrow-bar widths smaller than .03CM cannot be printed. Below is code
from a button on the form that performs this task:
Private Sub PrintForm_Click()
   Me.PrintForm
End Sub - Copy To Clipboard: This method sends the barcode
image graphic directly to the clipboard:
Private Sub CopyToClipboard_Click()
   Clipboard.Clear
   Clipboard.SetData BarCode1.Picture, vbCFMetafile
   'Optionally, display in an image box
   Image1.Picture = BarCode1.Picture
End Sub - Save To File: This method saves the barcode image
graphic directly to a file that may be imported into an application
that can display WMF files such as Microsoft Word:
Private Sub SaveToFile_Click()
   BarCode1.SaveEnhWMF "SavedBarCode.wmf"
End Sub - Use The Control as a DLL - The code below loads the barcode
control and prints without it being placed on a form:
Dim BC
When Visual Basic.NET is used, consider the .NET Forms Barcode Control because it is a managed code assembly and is easier to use in .NET.
Set BC = CreateObject("IDAuto.BarCode")
BC.DataToEncode = "DLL-TEST"
Printer.PaintPicture BC.Picture, 2048, 1024
Printer.EndDoc
Set BC = Nothing
Installation in Visual C++
- Choose the resource tab to view dialogs.
- To add a control to the dialog, right-click on the dialog form to the right and choose "Insert ActiveX Control."
- Select the correct barcode control from the list. The control should then appear in the dialog. Download the C++ barcode project for an implementation example.
Installation in Visual FoxPro
- In a Visual Foxpro Form, select the "OLE Container" from the standard toolbox.
- After the "Insert Object" dialog box opens, select an ActiveX Barcode Control that begins with "IDAutomation."
- The characteristics may be modified as necessary in the properties window.
- To print barcodes on reports or labels, a field must be used to store the barcode and it must be set up as an OLE Control with the data type of "general." Download the IDAutomation VFP barcode for an example for Visual FoxPro 6.0.
Installation in InfoPath
This tutorial will show users how to integrate the ActiveX Control into Infopath 2003 or greater.
Adjusting Properties
After activating the barcode control in an application, modify the properties of the control by code or by right-clicking on the control and selecting the properties option.
Linear Barcode Control Properties
| IDAutomation recommends using default values for all properties unless requirements dictate otherwise. | |||||
| Property Name | Default | Property Description | |||
| AddCheckDigit | 1 | AddCheckDigit automatically adds the check digit to the barcode if it is equal to 1. The check digit is required for all barcodes except Code 39, Industrial 2 of 5, and Codabar barcodes. | |||
| AddCheckDigitToText | 1 | AddCheckDigitToText automatically adds the check digit that is encoded in the barcode to the human-readable text that is displayed if it is equal to 1. | |||
| ApplyTilde | 1 | When ApplyTilde is set to "1" in Code 128 with the Auto character set, the format ~ddd may be used to specify the ASCII code of the character to be encoded. Several other tilde options are also enabled. | |||
| BackColor | 16777215 | The background color of the barcode specified as a number defined by the Visual Basic Color Constant. The background color represented as an integer number from 0 (black) to 16777215 (white) by combining the red, green, and blue values (each ranging from 0 to 255) to represent a color with the following formula: ((red * 1) + (green * 256) + (blue * 65,536)). | |||
| BarHeight | 1 | The height of the barcode in centimeters (CM). | |||
| BearerBarHorizontal | 0 | The width of the horizontal bearer bars as a multiple of the XDimension; valid options are 0-10. | |||
| BearerBarVertical | 0 | The width of the vertical bearer bars as a multiple of the XDimension; valid options are 0-10. | |||
| CodabarStartCharacter | A | The Start Character in the Codabar barcode. | |||
| CodabarStopCharacter | B | The Stop Character in the Codabar barcode. | |||
| Code128CharSet | 0 | The set of characters to be used in Code128. Valid values are Auto=0, A=1, B=2, or C=3. IDAutomation recommends using Auto. | |||
| DataToEncode | na | The data to be encoded in the barcode. If the barcode control is connected to a control source, the source will override this property. | |||
| EANUPCSupplement | 0 | The number of digits the UPC or EAN supplement will contain. | |||
| FixedResolutionCM | 0 | Sets the pixels per CM, which is useful when setting the resolution of the output image. The default setting is "0." | |||
| Font | Arial 8 Points | Used to change the font or point size of the text interpretation or human-readable text. In VB, this property may be changed in the code. For example BarCode1.Font.Size = 10 BarCode1.Font.Name = "Times New Roman" | |||
| ForeColor | 0 | The color of the foreground text
and bars in the barcode specified by the Visual Basic Color Constant.
The background color represented as an integer number from 0 (black)
to 16777215 (white) obtained by combining the red, green, and blue
values (each ranging from 0 to 255) to represent a color with the
following formula: ((red * 1) + (green * 256) + (blue * 65,536)). Black = 0. |
|||
| LeftMarginCM | 0.1 | The space of the left margin in centimeters (CM). | |||
| NarrowBarWidth or NarrowBarCM |
0.03 | NarrowBarWidth is the width in centimeters of the narrow bars. This is also referred to as the X dimension. The default is 0.03 CM, which is about .012" or 12 mils. This value may need to be increased if the scanner being used cannot read barcodes with small X dimensions. | |||
| Orientation | Zero degrees | Orientation indicates the orientation of the barcode. Valid values are Zero degrees, 90 degrees, 180 degrees, and 270 degrees. | |||
| Picture | image | Returns a WMF image without resolution information. | |||
| PostnetHeightShortBar | 0.125 | The size in centimeters of the short bars when using Planet and Postnet symbologies, and the tracker bar when using Intelligent Mail (formerly OneCode). | |||
| PostnetHeightTallBar | 0.30 | The size in centimeters of the tall bars when using Intelligent Mail (formerly OneCode), Planet and Postnet symbologies. | |||
| ShowText | Yes | If ShowText is yes (the default), the human-readable text will be displayed with the barcode. | |||
| SupplementToEncode | null | The 2 or 5-digit supplement to be encoded after the UPC or EAN barcodes. This property will populate automatically when the extra digits are added to the DataToEncode. | |||
| SymbologyID | 13 |
A number that selects the symbology or barcode type:
|
|||
| TopMarginCM | 0.06 | The top margin in centimeters. | |||
| UPCESystem | 0 | The encoding system to be used for UPC-E; valid values are 0 and 1. | |||
| WhiteBarIncrease | 0 | A percentage value to increase the white space between the bars to improve readability. Common values are 10, 15, 20, and 25. * | |||
| Wide2NarrowRatio | 2 | The wide-to-narrow ratio of symbologies that only contain narrow and wide bars such as Code 39, Interleaved 2 of 5, and MSI. Common values are 2, 2.5, 2.75, and 3. | |||
Methods
| GetEnhWMF() | Returns an enhanced WMF image with resolution information. | |
| GetXPixels() | Returns the X-dimension pixels of the image after it is created. | |
| GetYPixels() | Returns the Y-dimension pixels of the image after it is created. | |
| SaveBarCode(path as String) | Saves a WMF file without any resolution information. | |
| SaveEnhWMF(path as String) | Saves a WMF file with resolution information. | |
| SetPixelsXY(XPixels as Long, YPixels as Long) | Sets the pixels of the WMF file. | |
DataMatrix-Specific Barcode Properties
| IDAutomation recommends using default values for all properties unless requirements dictate otherwise. | ||
| Property Name | Default | Property Description |
| EncodingMode | E_BASE256 | Valid Encoding Mode values are E_ASCII, E_C40, E_TEXT, or E_BASE256. |
| MarginCM | 0.10 | The top and bottom margin in centimeters. |
| NarrowBarCM | 0.05 | The width in centimeters of the narrow bars; which is also referred to as the X dimension. The default is 0.05 CM which is about .02" or 20 mils. This value may need to be increased if the scanner cannot read barcodes with small X dimensions. If using a high-quality barcode imager, this value may be decreased to obtain a higher-density barcode. |
| PreferredFormat | -1 | Sets the preferred Data Matrix formats represented by a number; valid values are from 0 (10X10) to 23 (144X144) and from 24 (8X18) to 29 (16X48); the default value of -1 is used for automatic formatting. |
| ProcessTilde | No | When set to "Yes", the tilde (~) will be processed as explained in the DataMatrix Barcode FAQ. |
MaxiCode-Specific Barcode Properties
| IDAutomation recommends using default values for all properties unless requirements dictate otherwise. | ||
| Property Name | Default | Property Description |
| ApplyTilde | 1 | When set to "1," the format ~ddd may be used to specify the ASCII code of the character to be encoded as explained in the Maxicode Barcode FAQ. A setting of "0" will disable ApplyTilde. |
| Country | na | A 3-digit number representing the country code. Proper implementation for UPS and other transportation applications will automatically override this field. |
| Mode | 2 | The mode of compression and encoding used in the symbol. Modes 2 and 3 are designed for use in the transport industry. Mode 4 encodes up to 93 characters or 138 digits. Mode 5 encodes up to 77 characters and provides more error correction capabilities than mode 4. Mode 6 indicates that the symbol encodes a message used to program a reader system or barcode scanner. |
| ServiceClass | na | A 3-digit number representing the service code. Proper implementation for UPS and other transportation applications will automatically override this field. |
| ZipCode | na | The postal code; mode 2 uses a 9-digit numeric postal code and mode 3 uses a 6-character alphanumeric postal code. Proper implementation for UPS and other transportation applications will automatically override this field. |
PDF417-Specific Barcode Properties
| IDAutomation recommends using default values for all properties unless requirements dictate otherwise. | ||
| Property Name | Default | Property Description |
| ApplyTilde | 1 | When set to "1," the format ~ddd may be used to specify the ASCII code of the character to be encoded. Commonly used ASCII codes are ~009 which is a tab function and ~013 which is a return function. A setting of "0" will disable ApplyTilde. |
| ErrorCorrectionLevel | 2 | The Reed Solomon error correction level encoded in the symbol. |
| MacroPDFEnable | 0 | When set to "1," indicates that this barcode is part of a MacroPDF sequence. |
| MacroPDFFileID | 0 | Assigns a File ID to the MacroPDF barcode. Each barcode in the MacroPDF sequence must have the same File ID assigned to it. Valid options are 0-899. |
| MacroPDFSegmentIndex | 0 | The index number of each MacroPDF symbol must have a unique segment index, starting at zero and incrementing thereafter by one. |
| MacroPDFLastSegment | 0 | When set to "1," indicates that this is the final barcode in the MacroPDF sequence. |
| PDFColumns | 5 | The number of data columns in the PDF417 barcode. The default is 5 and the maximum is 30. |
| PDFMode | Binary | The mode of compaction used to encode data in the symbol. When set to "Text," a smaller symbol may be created. Text mode encodes all characters on the US keyboard plus returns and tabs. Binary mode encodes ASCII 1 to 254. |
| PDFRows | 0 | Sets the number of rows. It is recommended to leave this setting at 0, the default. |
| Truncated | 0 | A truncated PDF417 symbol is more area-efficient than a normal PDF417. When set to true, the right-hand side of the PDF417 is removed or truncated. |
| XtoYRatio | 3 | The X multiple height of individual cells; default = 3, usually 2 to 4 times the NarrowBarCM (X). |
Aztec-Specific Barcode Properties
| IDAutomation recommends using default values for all properties unless requirements dictate otherwise. | ||
| Property Name | Default | Property Description |
| ApplyTilde | False | When set to "True", the format ~d??? may be used to specify the ASCII code of the character to be encoded. Commonly used ASCII codes are ~d009 which is a tab function and ~d013 which is a return function. |
| MessageAppend | na | Specifies the message appended across multiple symbols. Only valid if NumberOfSymbols is greater than 1. |
| NumberOfSymbols | 1 | Invokes MessageAppend across # symbols |
| XDimensionCM | 0.06 | The width in centimeters of the narrow bars. This value may need to be increased if the scanner cannot read barcodes with small X dimensions. When working with a high-quality barcode imager, this value may be decreased to create a smaller symbol. |
QR-Code-Specific Barcode Properties
| IDAutomation recommends using default values for all properties unless requirements dictate otherwise. | ||
| Property Name | Default | Property Description |
| ProcessTilde | False | When set to "True", the format ~d??? may be used to specify the ASCII code of the character to be encoded. Commonly used ASCII codes are ~d009 which is a tab function and ~d013 which is a return function. |
| EncodingMode | Byte | The mode of compaction used to encode data in the symbol. Valid values are E_BYTE, E_ALPHANUMERIC, and E_NUMERIC mode. |
| Version | AUTO | Sets the size of the symbol; valid values are from 1 (21X21) to 40 (177X177); the default value of "AUTO" is used for automatic formatting. |
| ErrorCorrection | M | The error correction level encoded in the symbol. Valid values are ECL_L, ECL_M, ECL_Q, ECL_H. Higher error correction creates a larger symbol that can withstand more damage. |
| XDimensionCM | 0.06 | The width in centimeters of the narrow bars. This value may need to be increased if the scanner cannot read barcodes with small X dimensions. |
* When used with low-resolution devices such as the display screen, changes within the WhiteBarIncrease property value may not be visible in the barcode control itself. However, the change will usually show when printed if a printer with 300 DPI or greater is used. In addition, when saving the barcode as an image, WhiteSpaceIncrease can usually be seen with the SaveBarCode property, but not with the SaveEnhWMF property due to SaveEnhWMF formatting the image to the screen resolution.
Developer Notes for Programmers
Distribution with an Application
The file(s) to distribute after installation reside in the "WinSys" directory and begin with "IDAutomation." When distributing the ActiveX Barcode Control, it must be copied to the "System" directory of the destination PC and then the DLL must be registered. This process may be automated with installation utilities.
IDAutomation ActiveX Barcode Controls are packaged with the CreateInstall by Gentee. Within the CreateInstall application, the "Register as OCX or DLL" option must be selected for each ActiveX DLL file that will be registered. This is a powerful, easy-to-use application that has no runtime requirements. Other setup applications are also available that register DLLs such as the Microsoft Windows Installer.
Multi-Threading
Many instances of the ActiveX object within the application may be created as needed, although the DLL does not support multi-threading and will not run as a separate process.
Technical Support
Free product support may be obtained by reviewing the knowledgebase articles documented below and by searching the resolved public forum threads. Priority phone, email, and forum support is also provided via several contact methods within 30 days of purchase. Support after this complimentary period may be received with an active one-year Priority Support & Upgrade Subscription.
Knowledgebase Documents:
- Barcode Prints But Will Not Scan (or Scan Correctly)
- Extra Character Added To The End of a Codabar or Code 39 Barcode
- Linking to a Field in MSWord
- Code 128 Check-digits Not Viewable in The Human Readable Form
- Received an InvalidActiveXStateExceptionError
- Cannot Accurately Adjust X Dimension when Printing with Low-Resolution Printers
- Barcodes are Different Sizes when Printing to Printers with Differing Resolutions
- Barcode Size Changes in Design Mode or Size is Not Accurately Displayed on The Screen
- "There is No Object in This Control" Error or Cannot Adjust Control Properties
- Symbology-specific Issues for Code 128, UPC/EAN and Postal Barcodes
- Cannot Adjust NarrowBarWidth Accurately when Printing with Low Resolution or Less Than 600 DPI Printers
- Problems Occur After Running The Uninstall For The ActiveX Control
- Does The Maxicode Component Support UPS Compression?

